How to assign images to products with PicManager?
Our application provides the flexibility to assign images either automatically or manually, with the ability to configure the assignment logic in the general settings. Here’s a simple overview of how the image assignment works and the options you can choose from.
General Settings
To begin, go to Apps > PicManager > Media Upload > Settings, where you can set up your general assignment logic. Start by selecting the Matching Mode: choose AI Matching or Customizable matching:
Which gives you the flexibility to match by SKU or Title:
If you have set the Customizable matching criterion, specify the Matching type:
Full match will assign the image to a product, if the image title fully corresponds to the product title or SKU (for example, image title white_snowboard.jpg > product name White Snowboard).
Partial match, on the other hand, will allow you to assign the image to the product SKU, (for instance, image title White.jpg > product name White Snowboard).
If you upload several images to a single product at once, you will also need to set the corresponding separator type:

Please, ensure that the selected separator is not included into the image name. For instance, If you choose '_' as the separator, a valid image name would be 'image_1.jpg' where 'image' does not contain '_'. An invalid image name would be 'image_name_1.jpg' where 'image_name' contains the '_' character.
Then, specify media assignment (also available only for Customizable matching):
Assign to parent product and simple products will allow you to assign the image to parent options and simple products, omitting the product variants.
Assign to variants, parent products and simple products will assign the image to any corresponding product, including variants.
To control the behavior when adding media to existing files, specify where images should be added: before or after existing media:
Finally, select whether you like to generate Alt tags for images and if the tags should be based on the Product title or Variant title:
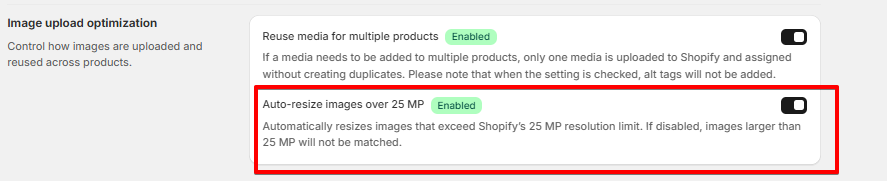
Finally, set Auto-resize images over 25 MP to "Yes" to automatically resize images that exceed Shopify’s resolution limit. If disabled, images larger than 25 MP will not be matched:
Once all options are set up, you can proceed to the Automatic or Manual image upload.
Automatic Upload
To upload images automatically in bulk, navigate to Apps > PicManager > Upload images > Automatic assign:
At the moment, we have a limit of 1000 images and a maximum file size that can be processed at once. We recommend keeping your batch size between 250 and 400 images for optimal performance.
You can drop your files from your computer or upload them from Dropbox or Google Drive. Images can also be uploaded with a CSV file or from existing Shopify images:
Next, the images will be matched to products according to the logic set in the general configuration. Any images that don’t match a product will be skipped during the upload process. If you find that the images aren’t matching with products as expected, please refer to this checklist for troubleshooting.
Select the required upload strategy and click Finish Upload:
Manual Upload
With manual upload, you have the ability to specify which products the images should be linked to or link a single image to several products. To manually assign images to products, go to Apps > PicManager > Image Upload > Manual Assign.
As the next step, upload your image and click Start Uploading. Choose to upload images to selected products:
Once done, you will get a pop-up where you can select the products to upload the images to:
You can select one or several products by clicking the checkboxes in the pop-up and click Select. As the next step, please, click Continue:
Select the required upload strategy and click Finish Upload:
Related Articles
How to set a main image for products with variants and assign individual images to each variant with PicManager?
To upload different images for the main product and each variant, use the Automatic Match option. This feature lets you assign images to the corresponding products and their options based on name or SKU. Go to Apps > PicManager > Settings, and select ...How to assign one image to several products at once with PicManager?
To assign the same image(s) to several products at once, you can try using the Manual match mode. To proceed, navigate to Apps > PicManager: Image Uploader > Upload and select the Manual assign option: As the next step, upload your image and click ...How to prevent images from being linked to product variants using the PicManager app?
If you want the images to be linked to simple products only, proceed to Apps > PicManager > Settings > Media assignment and select to assign the images to parent and simple products: In this scenario, the images will be assigned only to the main ...How do I bulk upload images to specific collections/vendor using the PicManager app?
To upload specific images to a particular vendor or collection, you can use the Manual Match mode. To do this, go to Apps > PicManager: Image Uploader > Upload and select the Manual Assign option: After selecting the images you want to upload and ...How to match an image to a product variant with PicManager?
To match an image to a product variant, you will need to follow the steps below: 1. Proceed to PicManager: Image Uploader > Settings and select the corresponding matching criterion, either the SKU or the Title of the variant. Once done, save your ...
Announcements
⚡ Have you enlarged the functionality of the Amasty extension with your own code? Share your improvements with us!
At Amasty, we understand that some of our clients require customized features to perfectly align the extension with their business needs. If you have developed new functionality within an Amasty module and would like to share it, please submit a ticket