Import and Export Guidelines
General Information About the Package and Its Tariff Plans
The Import & Export solution is designed for migrating data from one website to another or to/from a different platform, as well as for automated/manual updates of product quantities, prices, and other data.
Depending on business requirements, you may be interested in one of the three module versions:
Import and Export (Lite) FOR ONE-TIME MIGRATION | Import and Export Pro FOR PARTIALLY AUTOMATED TRANSFERS | Import and Export Premium FOR REGULAR AND FULLY AUTOMATED SYNC |
Includes:
| Includes everything available in Import and Export (Lite), plus:
| Includes everything available in Import and Export Pro, plus:
|
Additional features are available with an active support/product subscription. More details about them can be found in this article: Additional packages (provided in composer suggestions).
Amasty Import
This module allows importing various entities depending on the installed package version:
- Orders, Products, Customers – available in all versions.
- CMS Blocks and Pages, URL Rewrites, EAV Attributes, Catalog Price Rules, Cart Price Rules – available only in the Premium package.
The following profiles can be created for import purposes within this module: One-Time Export (available in all versions) or Cron Jobs (available only in Pro and Premium versions). The difference between one-time profiles and cron jobs is that cron jobs can be saved along with import settings for further automation by schedule.
General Settings
'Multi-Process Import' Tab
Enable Multi-Process Import = Yes/No
The setting is responsible for multithreading of product import. If enabled, several batches will be imported simultaneously when import is run.
The Multi-Process Import functionality requires the PHP extension "pcntl" pre-installed on the server.
Number of Parallel Processes = text field
The setting specifies the number of simultaneous threads to import orders.
The more threads are involved, the higher the load on the server.
'Advanced' Tab
Enable Debug Mode = Yes/No
Enabling this setting will display a more detailed information about import errors, including server errors. Also useful information about errors can be found in var/log/amasty_import_debug.log file.
Process Status Check Mode = System Process ID/Statuses
This option was added specifically to address issues on multi-node instances. Most often these are Magento Cloud instances. If data is not updated during import process or errors appear while the import process continues to run, we advise you to select the "Statuses" option in this setting. Otherwise, the default setting in the module is "System Process ID".
Max File Size Upload (MB) = text field. Default = 2
This functionality is available only by subscription after installing a suggested package called amasty/module-import-subscription-functionality. Installation guidelines can be found in the following article: How to install an Amasty extension?
This setting affects file size validation only in our module. The actual file size allowed for uploading may depend on PHP settings (upload_max_filesize) or server settings (client_max_body_size). Therefore, if the value indicated in the PHP and server settings is lower than in the admin setting, an error will appear. These values must match for correct operation.
Enable Import without Memory Limit = Yes/No
The setting should be enabled if the import process is interrupted due to exceeded memory limit.
'System Settings' Tab
CLI PHP Path
Contains information about the PHP Path used by the module to run the import. If import gets stuck at any step of import profile (products, customers, orders), you should check which path is used to execute Magento commands on the server and what is specified in this setting. The following article describes the process in more details: What to do if Import/Export gets stuck at step 2?
One-time Import
One-time import is available at System > Amasty Import > Import. Here, you can select the desired entity to be imported and proceed to customize the required fields:
Import Behavior = Add/Update, Only Add, Only Update, Delete
Choose whether you want to add new, update existing, or delete the data.
Validation Strategy = Stop On Error/Skip Error Entries
The Stop On Error strategy will stop the import at the first error while the Skip Error Entries strategy will skip minor errors in the number specified in the Allowed Errors Count setting. It should be noted that major errors will still stop the import anyway in this case. As an example, if there are no entity identifiers in the file and the names and order of columns do not match, the module will interrupt the import process.
Import Source = Local Directory/File Upload/FTP/SFTP/URL/Google Sheets/REST API Endpoint/Dropbox/Google Drive
Import File Type = CSV/XML/JSON/ODS/XLSX
Additional settings for CSV/XLSX formats:
Rows Merged into one = Yes/No
When this option is enabled, there's no need to duplicate product information across multiple rows in the file; you can list it comma-separated values within a single cell. It's important to note that if you're duplicating attributes, websites, etc., then SKU and product_id must also be duplicated in every row, except for the root entity.
Field Delimiter (text field)
Default: comma (",")
Field Enclosure Character (text field)
Used when multiple words exist in one field. Default: quotation marks (")
Prefix/Tag Delimeter (text field)
Separates entity keys from field names. Default: dot ("."), e.g., catalog_product_attribute.color
Fields Configuration
The fields of the root entity are preselected by default. You may delete the fields not needed for the import. Please note that the entity_id field is required for the correct import process.
Cron Jobs
The functionality is available at System > Amasty Import > Cron Jobs. The profile is created similarly to One-Time Import, but this cron job can be saved and used for import by schedule later. Therefore, beside the fields available for one-time import already mentioned above, you may find the following settings in the profile:
Cron Job Title = text field where you can insert a name for internal reference
Enabled = Yes/No
The setting below appears if Enabled is set to Yes:
Frequency = Custom/Every Minute/Every Hour/Every Day at 4 am/Every Monday at 4 am/Every First Day of the Month at 4 am
Schedule by cron when import will be run. You can choose a ready-made one (it will be pulled from the Frequency setting), or insert a custom one. To create a custom schedule, you can check the Crontab guru resource.
Import History
Import History grid is located in System > Amasty Import. It contains information about profile name and number, status, import completion date, logs of the process (both successful and with errors), as well as number of created/updated/deleted entities.
Amasty Export
The module is located at System > Amasty Export > Export and allows exporting various entities depending on the installed package version:
- Orders, Products, Customers – available in all versions;
- CMS Blocks and Pages, URL Rewrites, EAV Attributes, Catalog Price Rules, Cart Price Rules – available in the Premium package.
For exporting, profiles can be created as either One-Time Export (available in all versions) or Cron Jobs (available only in Pro and Premium versions). The difference between one-time profiles and cron jobs is that cron jobs can be saved along with export settings for further automation by schedule.
General Settings
'Multi-Process Export' Tab
Enable Multi-Process Export = Yes/No
This setting enables multi-threaded product export. If enabled, multiple batches will be processed simultaneously, speeding up the export process.
This setting enables multi-threaded product export. If enabled, multiple batches will be processed simultaneously, speeding up the export process.
Multi-Process Export requires the "pcntl" PHP extension installed on the server.
Number of Parallel Processes = text field
This setting determines the number of simultaneous threads used for data export.
The more threads are involved, the higher the load on the server.
'Advanced' Tab
Enable Debug Mode = Yes/No
Enabling this setting allows displaying detailed error logs during export, including server errors. Additional logs can be found in var/log/amasty_export_debug.log.
Enabling this setting allows displaying detailed error logs during export, including server errors. Additional logs can be found in var/log/amasty_export_debug.log.
Process Status Check Mode = System Process ID / Statuses
This setting was added to resolve issues on multi-node instances (e.g., Magento Cloud instances). If the export status is not updating or errors appear while the process continues running, select "Statuses" in this setting. Otherwise, the default setting is "System Process ID".
This setting was added to resolve issues on multi-node instances (e.g., Magento Cloud instances). If the export status is not updating or errors appear while the process continues running, select "Statuses" in this setting. Otherwise, the default setting is "System Process ID".
Enable Export without Memory Limit = Yes/No
This setting should be enabled if the export process fails due to memory limits.
This setting should be enabled if the export process fails due to memory limits.
'System Settings' Tab
CLI PHP Path
This field contains information about the PHP path used by the module for running exports.
This field contains information about the PHP path used by the module for running exports.
If exports freezes at any step (e.g., exporting products, customers, or orders), check the path used for executing Magento commands on the server.
For more details, refer to the following article: What to do if Import/Export gets stuck at step 2?
One-Time Export
One-time export is available at System > Amasty Export > Export. Here, you can select the entity to be exported and configure the required fields.
File Type: CSV, XML, JSON, ODS, XLSX, Template
Each file type has its own export settings.
CSV Export Settings
Add Header Row = Yes/No
Adds or removes column names from the export file.
Adds or removes column names from the export file.
Merge Rows into One = Yes/No
If enabled, entity data will be merged into one cell instead of appearing in separate rows.
If enabled, entity data will be merged into one cell instead of appearing in separate rows.
Example: If a product has an attribute with multiple values, they will be listed in a single cell (separated by commas) instead of separate rows.
Duplicate Parent Entity Data = Yes/No
If disabled, parent entity data will not be duplicated on every row, if enabled, the parent data will be duplicated (root entity fields of the profile).
Field Delimiter (text field)
Default: comma (",")
Field Enclosure Character (text field)
Used when multiple words exist in one field. Default: quotation marks (")
Entity Key Delimiter (text field)
Separates entity keys from field names. Default: dot ("."), e.g., catalog_product_attribute.color
XML Export Settings
XML Item Tag – Default: item
The tag wrapping the exported product data.
Header – Default:
- <?xml version="1.0"?>
- <items>
Footer – Default:
- </items>
The header and footer must have the same tag name: if the header is <items>, the footer must be </items>.
XSL Template
Allows customizing attribute tags and entities in the export file.
JSON Export Settings
Header
Default: [
Footer
Default: ]
Default: ]
ODS & XLSX Export Settings
Add Header Row = Yes/No
Adds or removes column names from the export file.
Adds or removes column names from the export file.
Merge Rows into One = Yes/No
If enabled, entity data will be merged into one cell instead of appearing on separate rows.
Duplicate Parent Entity Data = Yes/No
If disabled, parent entity data will not be duplicated on every row.
Entity Key Delimiter (text field)
Default: dot ("."), e.g., catalog_product_attribute.color
Template Export Settings
Header
Depending on the extension of the file, this setting should contain any attributes for CSV format or "[" for JSON format.
Content
Should contain information about the enabled fields. For instance:
- {% set order_items = [] %}
- {% for order_item in item.sales_order_item %}
- {% set order_items = order_items|merge([order_item.sku]) %}
- {% endfor %}
- {% set order_items_ouput = order_items|join(',') %}
- #{{
- "#{ item.increment_id }"
- }},"{{
- "#{ item.grand_total } #{ item.order_currency_code }"
- }}","{{
- "#{ order_items_ouput }"
- }}"
Item Delimiter
Leave empty for CSV format, use comma for JSON format.
Leave empty for CSV format, use comma for JSON format.
Footer
Leave empty for CSV format, use "]" for JSON format.
Leave empty for CSV format, use "]" for JSON format.
Extension = csv/json
Additional Export Settings
File Name – File name, indicated without file format.
Output File Encoding – Default: UTF-8
Compress Export File with Gzip = Yes/No
Enables exporting files in a compressed .zip format.
Fields Configuration
Select the fields with the data you need to export. Detailed information can be found in the Amasty Import and Export User Guide .
If the export will be used for subsequent import, ensure the same fields are exported to simplify data modifications.
Filters
Filters can be applied to export only the relevant data you need. Available filter fields depend on the selected entities in the profile:
Cron Jobs
Available at System > Amasty Export > Cron Jobs, cron jobs are similar to One-Time Export and have the same settings, but they can be saved and scheduled for later.
Additional Cron Job Fields:
Cron Job Title (text field) – Enter a job name.
Enabled = Yes/No
Additional settings appear if Enabled = Yes.
Frequency – Choose from:
- Custom
- Every Minute
- Every Hour
- Every Day at 4 AM
- Every Monday at 4 AM
- Every First Day of the Month at 4 AM
Schedule
Use predefined options or set a custom schedule.
For more convenience, feel free to use Crontab Guru website for generating cron expressions.
Export History
This grid stores logs for One-Time Export and Cron Jobs.
For Export Orders/Products/Customers export logs, check the History tab in their respective profiles instead.
Log details include:
- Export entry and ID;
- Status;
- Export date;
- Process logs (success & errors);
- Number of exported records;
- A link to download the exported file;
- Entity.
General Settings for Import Products/Orders/Customers Modules
The settings, grids, and history are identical across all import modules.
The general settings include two tabs:
The general settings include two tabs:
General Settings
Import Batch Size
Determines the number of products processed per batch.
Determines the number of products processed per batch.
Import History Auto-Cleaning
Enables automatic removal of records from Import History. Records older than the period specified in Auto-Cleaning Period (Days) are deleted.
Enables automatic removal of records from Import History. Records older than the period specified in Auto-Cleaning Period (Days) are deleted.
Multi-Process Import
Enable Multi-Process Import
Enables multi-threaded import to speed up processing.
Enables multi-threaded import to speed up processing.
1. This setting only applies to Import Products/Customers/Orders profiles. Multi-processing for Amasty One-time Import and Amasty Export Cron Jobs must be enabled in Amasty Extensions > Import.
2. Requires PHP extension "pcntl" installed on the server. If enabling the setting has no effect, the client should contact their hosting provider to verify if the extension is installed.
2. Requires PHP extension "pcntl" installed on the server. If enabling the setting has no effect, the client should contact their hosting provider to verify if the extension is installed.
More parallel processes = faster export, but higher server load.
Import Profiles Grid
Located at System → Amasty Import → Import Products/Orders/Customers.
This grid displays all existing profiles, including their IDs, names, file formats, execution type (manual/cron), the date of last run.
Structure and Configuration of Import Profile
Import profiles consist of 9 setup steps, but not all steps are mandatory. For example, Import Filters and Automatic Import are optional, while Import History helps verify whether profiles are imported successfully, especially when scheduled imports are used.
General Configuration
Profile Name
Internal name of the profile. This name will be displayed on the grid.
Internal name of the profile. This name will be displayed on the grid.
Batch Size
Number of products processed in one iteration.
Number of products processed in one iteration.
Reindex After Importing (applicable for Import Products profile)
If enabled, reindex is automatically performed after import.
If enabled, reindex is automatically performed after import.
Regenerate URL Rewrite (applicable for Import Products profile)
If enabled, the module will generate a URL rewrite based on the 'url_key' imported from the file.
Disable Products Not in File (applicable for Import Products profile)
If enabled, only products from the import file will remain active, while existing ones will be disabled. Useful for full catalog updates to ensure only imported products are visible on the frontend.
If enabled, only products from the import file will remain active, while existing ones will be disabled. Useful for full catalog updates to ensure only imported products are visible on the frontend.
Skip Existing Products (applicable for Import Products profile)
If enabled, the module will skip existing products (if they are in the import file) and import only new ones. Used with the Only Add import mode.
If enabled, the module will skip existing products (if they are in the import file) and import only new ones. Used with the Only Add import mode.
Remove Product Categories (applicable for Import Products profile)
If enabled, the products listed in the import file will have their category associations removed (i.e., the "Categories" field will be emptied). If categories are specified in the file, they will be assigned to the product afterwards; if not, the product will have no assigned categories.
If enabled, the products listed in the import file will have their category associations removed (i.e., the "Categories" field will be emptied). If categories are specified in the file, they will be assigned to the product afterwards; if not, the product will have no assigned categories.
This feature was added in Import & Export Premium 1.13.0 and Import Products 2.0.0. Available only with the amasty/module-product-import-subscription-functionality package installed (it becomes available with an active product/support subscription).
Import Sources
Available sources for importing:
- Local Directory
- File Upload
- FTP
- SFTP
- URL
- Google Sheets
- REST API Endpoint
- Dropbox
- Google Drive
Detailed descriptions for each source can be found in the Guide for Import and Export for Magento 2.
File Settings
Supported import formats:
- CSV
- XML
- JSON
- ODS
- XLSX
Additional settings for CSV, ODS, and XLSX file formats:
Rows Merged into One
If enabled, product data does not need to be duplicated across multiple rows; instead, values can be listed in one cell, separated by the delimeter set in the Merged Rows Data Delimiter setting. This means that if attributes, websites, etc., are duplicated, then SKU and product_id must also be duplicated in every row except for the root entity.
Field Delimiter (text field)
The separator for fields in the file. Default: comma (,).
Field Enclosure Character (text field)
Used when multiple words exist in one field. Default: quotation marks (").
Additional settings for JSON files:
Header
By default "[" is required.
Items Container Name
Specify the path to the container with items (optional). For example, data/items or items.
Specify the path to the container with items (optional). For example, data/items or items.
Footer
By defaulit "]" is required.
By defaulit "]" is required.
Additional settings for XML files:
The Data XPath field should specify the node path from the import file. For example, for the file below it will be items/item:
- <items>
- <item>1</item>
- <item>2</item>
- </items>
Import Settings
This tab defines import behavior.
Import Behavior
Choose the import mode from the ones below:
Choose the import mode from the ones below:
1) Add/Update
Compares product identifiers in the import file with existing products in Magento:
Compares product identifiers in the import file with existing products in Magento:
- If the identifier is unique, a new product is created.
- If a product with the same identifier already exists, the module updates or adds the provided data.
2) Only Add
Imports only new products with unique identifiers, skipping existing ones.
Imports only new products with unique identifiers, skipping existing ones.
3) Only Update
Updates existing products only, skipping new ones.
4) Delete
Deletes products listed in the import file from Magento.
Deletes products listed in the import file from Magento.
Enable Autofill for Typical Use Cases
If enabled, the profile will automatically include the minimum required fields to prevent import errors and ensure proper record processing.
Enabling autofilling helps prevent errors and ensures that the required fields are mapped in the profile.
Product Identifier = Product Entity ID/Product SKU/Custom Attribute
Select the product identifier to be used. If Custom Attribute is chosen, specify the attribute used as the primary identifier:
Select the product identifier to be used. If Custom Attribute is chosen, specify the attribute used as the primary identifier:
- Product Name
- SKU
- Meta Title
- URL Key
Validation Strategy = Stop On Error /Skip Error Entries (adds the Allowed Errors Count setting)
Choose how errors are handled:
Choose how errors are handled:
- Stop On Error – Import stops on the first error.
- Skip Error Entries – Import continues, skipping invalid data.
Not all errors will be skipped. For example:
Import will fail if mandatory field is missing (e.g., SKU in root entity);
Import will succeed if incorrect category path is inserted in the import file (category won't be assigned, but import continues).
Allowed Errors Count – Specify the number of errors after which the import process will stop.
Fields Configuration (Assigning Entities & Entity Keys)
It is important to review the following settings:
Use Custom Entity Key = Yes/No
Use Custom Entity Key = Yes/No
Entity Keys are required for the correct import process, they should be inserted in the import file along with the fields' names. If you'd like to adjust the default entity keys, enable this setting for the corresponding entity key.
Indicating entity keys (either default ones from Magento database or custom ones) for subentities is required for successful import. If entity keys aren't added to field named in the import file, data will be imported incorrectly. At the same time, you don't need to indicate any keys for root entity.
For example, if you're importing products, fields from Product entity don't need to have any keys indicated in their names. However, for the rest of dependent subentities, like Product Attribute, adding keys to field names is necessary.
Custom Entity Key
Insert custom entity key that will be mentioned in the import file.
Insert custom entity key that will be mentioned in the import file.
Entity Key Delimiter (text field)
Separates entity keys from field names. Default: dot ("."), e.g., catalog_product_attribute.color
Delimiters must be unique. For example: if comma is set as both the Entity Key Delimiter and Field Delimiter, the module will fail to import data from entities that have entity keys, e.g. name, price, etc.
Detailed instructions on how to map the fields are available in the Guide for Import and Export for Magento 2 .
Additional information can be found in this article: Products are being imported without name, price, and other values. How to fix this?
Import Filters
This tab allows filtering products to import only the needed ones, for example, only products with the "Gear" category from the import file. The filtering structure matches the field configuration, so you can filter data by any field added to the profile.
Automatic Import
Once the profile is configured and successfully tested, automatic import of new products can be set up.
Run Profile by Cron = Yes/No
If enabled, import runs automatically via cron at the specified schedule.
If enabled, import runs automatically via cron at the specified schedule.
Frequency
Choose or set a custom schedule for imports.
Choose or set a custom schedule for imports.
For more convenience, feel free to use Crontab Guru website for generating cron expressions.
Alert Notifications
This tab allows enabling email notifications for errors in a specific profile.
Enable Email Alert
Set to Yes to notify recipients about failed imports.
Set to Yes to notify recipients about failed imports.
Email Sender
Select the contact who will send automated emails.
Select the contact who will send automated emails.
Email Recipients
Specify who will receive notifications.
Specify who will receive notifications.
Email Template
Choose the template for failure notifications.
Choose the template for failure notifications.
Import History
This tab appears in a profile only after this profile has been saved. It contains a grid displaying all import records, including:
- Manual imports
- Automated imports
This is useful for verifying successful imports and ensuring that scheduled imports run correctly.
Logs show import completion time. Therefore, if the import takes 40 minutes, the displayed time will differ from the cron job start time for 40 minutes, which is expected.
General Settings for Export Products/Orders/Customers Modules
The module structure is similar across all export modules, with the same settings, columns, and grids.
The general settings are divided into two tabs:
The general settings are divided into two tabs:
General Settings
Enable Module
Enables/disables the module.
Enables/disables the module.
Export Batch Size
Determines the number of products processed per batch. This is a default setting for all profiles, but it can be adjusted for each profile individually.
Determines the number of products processed per batch. This is a default setting for all profiles, but it can be adjusted for each profile individually.
Log Auto-Cleaning
Automatically cleans logs from Export History. Records will be deleted after the period specified in Log Auto-Cleaning Period (Days).
Automatically cleans logs from Export History. Records will be deleted after the period specified in Log Auto-Cleaning Period (Days).
Export Files Auto-Cleaning
Deletes generated export files automatically after the period specified in Export Files Auto-Cleaning Period (Days).
Deletes generated export files automatically after the period specified in Export Files Auto-Cleaning Period (Days).
Multi-Process Export
Enable Multi-Process Export
Enables multi-threaded export to speed up processing.
Enables multi-threaded export to speed up processing.
1. This setting only applies to Export Products/Customers/Orders profiles. Multi-processing for Amasty One-time Export and Amasty Export Cron Jobs must be enabled at Amasty Extensions > Export.
2. Requires PHP extension "pcntl" installed on the server. If enabling the setting has no effect, contact your hosting provider to verify if the extension is installed.
2. Requires PHP extension "pcntl" installed on the server. If enabling the setting has no effect, contact your hosting provider to verify if the extension is installed.
More parallel processes = faster export, but higher server load.
Export Profiles Grid
Profiles are located at System → Amasty Export → Export Products/Customers/Orders:
Using this grid, users can:
- View, delete, or create new profiles;
- Manually run any profile without opening it.
3rd Party Connections
This feature allows adding custom data from Magento tables that are not included by default in export profiles. Moreover, connections can be created not only with default Magento tables, but also with Amasty modules' tables.
 The tables that are to be joined must contain a column that can be mapped to the root entity in the export profile. For example, for products it will be 'product_id'.
For instance, in order to add the wishlist data to the export products profile, click Add New Connection and create a new integration. Then, fill in the fields:
1. Name – A descriptive name for the connection (e.g., "wishlist"). It will appear as a new entity in the export profile.
2. Export Type – Choose between Export Customers, Orders, or Products.
Once 'Export Products' option is selected, additional fields appear:
Once 'Export Products' option is selected, additional fields appear:
3. Table to Join – The name of the table to be linked. The module lists all available database tables, and users can search for the necessary table.
4. Parent Entity – The entity to which the external table will be linked (e.g., "Product" as the root entity).
Additional fields appear after selecting a table:
5. Referenced Table Key – The key field from the external table (the one that you need to add) used for linking (e.g., product_id).
6. Base Table Key – The key field from the Parent Entity (Customer/Order/Product) used for linking (e.g., entity_id).
After saving, the wishlist entity will be added to the export profile.
Export Profile Structure and Configuration
General Configuration
The first tab contains the basic settings for the export profile. We'll be reviewing all settings using the example of Export Orders profile.
Profile Name
The internal name of the profile which will be displayed on the grid.
Export Only New Entities
Previously exported orders/products/customers will be skipped if this option is enabled.
This option is useful for regular or automated exports when only new orders are needed.
Batch Size
Defines the number of orders processed per batch. The value can be set per profile, or you may use the default value from the general settings.
Duplicate Profiles
Existing profiles can be duplicated to create similar ones quickly.
Actions With Orders After Exporting
Certain automatic actions can be performed after order export:
Change Processed Orders Status To
Sets the status of exported orders.
Sets the status of exported orders.
Add Comment to Status History
A comment will be added to the order status history after export.
A comment will be added to the order status history after export.
Invoice, Ship, or Cancel Orders After Export
Generate invoices, mark orders as shipped, cancel orders after export (if enabled, an additional option appears to notify customers).
Output Options
File Name
The name of the exported file.
You can use {date|format} variables to dynamically set the filename.
Example: Filename-{date|Y_m_d_h_i_s}
PHP date formats: PHP Date Formatting
Output File Encoding
Sets the file encoding type (default: UTF-8).
Compress Export File With Gzip
Enables file compression to save server space.
Export File Storage
The module supports exporting files to various storage locations:
Store Exported File on Server
Saves the file on the same server where Magento is installed (var/ folder).
Upload Exported File by FTP / SFTP
Allows uploading exported files to external servers.
Send Exported File to Email
Allows specifying the emails the exported file will be sent to.
Google Drive
Allows uploading exported files to Google Drive.
The exported files won't rewrite the previous version, a new file with the same name will be uploaded to Google Drive.
Dropbox
Allows uploading exported files to Dropbox.
Currently, the Dropbox connection token is temporary, requiring manual re-authentication.
For detailed Google & Dropbox connection settings, refer to this guide: Import & Export: Output Options.
File Settings
At this step, select the file format and configure key parameters.
Supported formats:
- CSV
- XML
- ODS
- XLSX
- JSON
- Template
To use ODS and XLSX, the Spout PHP library must be installed on the server.
CSV, ODS, XLSX Settings
Add Header Row
Adds column names in the first row.
Adds column names in the first row.
Merge Rows into One
Combines multiple rows into a single cell.
Combines multiple rows into a single cell.
Duplicate Parent Entity Data = Yes/No
If enabled, child entity data is duplicated from the parent entity.
If enabled, child entity data is duplicated from the parent entity.
The data will be duplicated for the root entity fields in the rows, where the data about configurable options is provided.
If you intend to re-import the file to Magento, there is no need to use this setting, as the structure of export file by default corresponds to the structure required to import data to Magento database by our import extension.
Here is an example before and after enabling the setting:
1) Before enabling:
2) After enabling:
CSV-Specific Settings
Field Delimiter (text field)
The separator for fields in the file. Default: comma (,).
Field Enclosure Character (text field)
Used when multiple words exist in one field. Default: quotation marks (").
XML-Specific Settings
XML Item Tag – Default: <item>
The tag wrapping exported product data.
Header
Default: <?xml version="1.0"?> <items>
Default: <?xml version="1.0"?> <items>
Footer
Default: </items>
Default: </items>
The header and footer must match: if the header is <items>, the footer must be </items>.
Here is an example of the XML structure:
XSLT Editor
Allows inserting an XSL Template for customizing the XML output (tags names, entities).
Example of Exported XML Data:
- <items>
- <item>
- <product_id>123</product_id>
- <name>Sample Product</name>
- <price>19.99</price>
- </item>
- </items>
JSON-Specific Settings
Header
Default - [
Footer
Default - ]
Template-Specific Settings
Template
Select either JSON or CSV Sample to use for export. The rest of the fields are populated automatically based on the selected sample.
Fields Configuration (Assigning Entities & Entity Keys)
Please pay attention to the following settings:
Use Custom Entity Key = Yes/No
Use Custom Entity Key = Yes/No
Enable this setting if you need to change entity key names from the default keys from Magento database to other key name (for example, for importing the file in another system).
Custom Entity Key
Insert custom entity key that will be added to the export file.
Insert custom entity key that will be added to the export file.
More additional details on adding export fields can be found in our User Guide: Guide for Import and Export for Magento 2.
Export Filters
This tab allows setting filters for exported data.
For date fields such as "created_at" and "updated_at", special Date filters are available, allowing you to export orders placed within the last X days or weeks.
Subentity fields become available only after adding corresponding fields in the Fields Configuration tab.
If you want to filter data based on partial matches, the like/not like filters are suitable for this:
- Not Like filters out results that contain the specified value.
- Like filters results to include only those that contain the specified value, also based on partial matching.
Filter After Modifier Applied – filters data only after a specific modifier has been applied to a field. The modifier is assigned to a field in Fields Configuration tab and works both for exported values and the default value, if it's set.
The Exclude Parent Entity Row If No Results Found setting ensures that a parent entity row is excluded from the export file if none of its child products contain values matching the applied filters. Otherwise, all parent entities and irrelevant child products will be included in the file.
For example, if we are filtering products by color and set the filter Color = pink, then if the Exclude Parent Entity Row If No Results Found setting is not enabled, the export will include not only products with the specified attribute value, but also parent products that do not have this value set.
To remove parent products that do not have a value, as well as their child products that do not have the pink value in the color attribute, we enable the setting in question and obtain the following result:
Automatic Export
It is possible to automatically export profiles either by cron or by event:
When exporting by cron, the profile is exported according to a set schedule. Cron must be running on the instance. You can check the cron job by its name amasty_cron_run_order_export_*, where * is the profile ID:
To export by event, you need to select a specific event that will trigger profile export.
For Export Orders, the profile can be exported based on the following events:
- Order creation (both from the frontend and the admin panel);
- Invoice creation;
- Shipment creation;
- Credit memo creation.
For Export Products:
- Product saving (changes in the product are not required; the export will be triggered simply by clicking the Save button on the product page).
For Export Customers:
- New customer registration (only considers account creation from the frontend, not customer creation in the admin panel).
Additional customer export profile's events listed below are available after installation of the "amasty/module-customer-export-subscription-functionality" module, which is available with active Support or Product Subscription. Installation guidelines can be found in the article:
How to install an Amasty extension?
- Customer Save
- Customer Edit By Admin
- Customer Logout
- Customer Login
Alert Notifications
This tab enables email alerts for export failures.
Enable Email Alert
Select Yes to notify recipients of failed exports.
Select Yes to notify recipients of failed exports.
Email Sender
Choose the sender from the dropdown.
Choose the sender from the dropdown.
Email Recipients
Enter recipient emails (comma-separated).
Enter recipient emails (comma-separated).
Email Template
Select a failure notification template.
Select a failure notification template.
Profile Export History
Each profile has a dedicated export history, where you can:
- Check statuses;
- Review timestamps;
- View logs;
- See the number of exported records;
- Download successful export files.
Export Field Names without Entity Keys
 This feature is available only with active subscription after installing the amasty/module-export-subscription-functionality package. Installation guidelines can be found in the article: How to install an Amasty extension?
After installing the package in question, the Export Field Names without Entity Keys toggle will become available in File Settings tab, allowing you to exclude entity keys from the header row of the CSV, ODT, and XLSX files:
Export Merged Fields
This feature is available only with active subscription after installing the amasty/module-export-merged-fields package. Installation guidelines can be found in the article: How to install an Amasty extension?
After installing the package, the Merge Fields button will become available in Fields Configuration tab, allowing to create fields that combine data from multiple attributes. You can also customize the names of these fields and use symbols or words (e.g., "and" or "/") to separate the data within them.
For instance, in order to export First Name + Last Name in a single field, we can create a new merged attribute:
Here is the result:
Product Review Export
The functionality is available only with an active subscription after installing the "amasty/module-product-review-export" package. Installation guidelines can be found in the article: How to install an Amasty extension?After installing the package, the 'Google Product Review' template will appear in System > Amasty Export > Cron Jobs. The cron job is disabled by default and needs to be enabled for it to work. Inside the entry, the file type XML is selected, and a pre-generated XSL template is available.
It is possible to modify the job settings, such as File Type, but in this case the XSL template will be lost. After saving the changes, the original job format cannot be restored. Therefore, it is recommended to save the template separately before making any changes, or duplicate it.
Product Advanced Review Export
The functionality is available only by subscription after installing the "amasty/module-product-advanced-review-export" package. Installation guidelines can be found in the article: How to install an Amasty extension? For this feature to work, the Advanced Product Reviews module should also be installed.
After installing the module, an entry called 'Advanced Product Review' will appear at System > Amasty Export > Cron Jobs. By default, the cron job is disabled and needs to be enabled for it to work. Inside the entry, the file type XML is selected, and a pre-generated XSL template is available.
It is possible to modify the job settings, such as File Type, but in this case, the XSL template will be lost. After saving the changes, the original job format cannot be restored. Therefore, it is recommended to save the template separately before making any changes, or duplicate it.
How to Use Modifiers
Modifiers are settings applied to the fields to change the value of data that will be pulled into these fields from the import file or added to the exported data. Some modifiers are automatically added to fields when they are enabled in Fields Configuration, as they are commonly used. However, when creating an import/export profile, it is important to ensure that the necessary modifiers are enabled, and/or disable the ones that aren't needed.
Within the export file, modifiers can affect the default value that is set up in fields. However, in import profiles, modifiers are applied only to the data from the import file. If additional Default Value is defined in import profile, this value will overwrite both the data from the import file and the modifier applied to that data.
For example, for the Color attribute, modifier Option Label to Option Value is applied:
Therefore, we can specify Green in the import file. However, if we want to set the green color for all imported products, we need to enter the value instead of the label in the Default Value field, and remove the modifier:
You can check the ID of attribute value at Stores > Attributes > Product. Select the required attribute, then right-click on the desired option and select Inspect:
Types of Modifiers
Modifiers are categorized into:
- Text Modifiers – Modify text values (e.g., uppercase, lowercase, trim).
- Numeric Modifiers – Modify numeric values (e.g., rounding, arithmetic operations).
- Date Modifiers – Format and adjust date values.
- Custom Modifiers – Replace one field value with another (specific to import/export cases)
General information about the modifiers available in the extension can be found in the Amasty Import and Export User Guide.
Here are the popular modifiers explained:
1) The Replace modifier.
By default, Import and Export module only accepts values that match those stored in the database. For example, in the fields inventory_stock_item.is_in_stock and inventory_source_item.status it expects values of type 1 and 0, where 1 means "in stock" and 0 means "out of stock". If you receive import files from vendors or create them manually using "In Stock" / "Out of Stock" values, there is no need to modify the files manually and edit each cell. It is sufficient to add the Replace modifier and map "In Stock" to 1 and "Out of Stock" to 0:
2) Full Match Replace works similarly to the Replace modifier. However, it replaces the value from the first field (From) with the value from the second field (To) only if there is a complete match with the value in the first field.
For example, let's consider a case where a category path exists in the import file as 2|4|122, and we need to replace '|' with '/'. In this case, the standard Replace modifier would be suitable. However, if you need to replace only '2' with '3', it is better to use the Full Match Replace modifier. If you choose the standard Replace modifier and set From: '2' and To: '3', this may unintentionally change '122' to '133' due to the presence of '2' within the value.
File Preparation and Import Specifics for CSV, XLSX, and ODT Files
For these formats, it is essential that column names match the field names, include entity keys, and follow the same order as in the Fields Configuration tab (columns can't be mixed between each other).
Additionally, the profile contains the following settings:
- Field Delimiter (default: comma)
- Field Enclosure Character (default: quotation marks)
- Entity Key Delimiter (default: period)
It is important not to have the same delimiters for several settings, as they must be unique. For instance, setting comma for both Entity Key Delimiter and Field Delimiter prevents the module from importing data beyond the root entity (where entity keys are absent).
Examples of import files with the required fields are available here: Import Sample Files.
File Preparation and Import Specifics for XML Files – XSL Template
Import and Export module supports an XSLT editor, which allows creating XML files with custom formatting. Using this functionality, it is possible to create custom XML document templates, add, remove, rearrange, or sort elements within the file, modify tag names, and more - all without altering the original file.
Basic elements used in XSL templates:
xsl:template – specifies which template will be used; when this element appears in the XML, it will be processed according to our XSL template.
xsl:element – an element of the XML structure, a tag.
xsl:for-each – used to output data of multiple entities (websites, custom product options) or to read data of multiple entities (order items, categories).
In the profile configuration, it is necessary to specify Data XPath for reading data. This defines the data reading structure, with the default value set to items/item.
Structure of XML Body:
- <xsl:template match="import_file_root__object_tag_name">
- <xsl:element name="items"> <!-- items - the name of the main element in the data structure from the profile configuration is Data XPath Root Element. -->
- <xsl:for-each select="import_file_entity_object_tag_name">
- <xsl:element name="item"> <!-- item - the name of the element containing entity data from the profile configuration is Entity Data Element. -->
- <!-- item body -->
- </xsl:element>
- </xsl:for-each>
- </xsl:element>
- </xsl:template>
To retrieve an attribute value, the following structure is used:
- <xsl:value-of select="IMPORT_FILE_TAG_NAME"/>
To obtain attributes of the parent entity, it is necessary to define tags with the attribute code and specify what value should be retrieved from the import file within the tag body:
- <sku><xsl:value-of select="sku_data"/></sku>
where:
<sku></sku> – a tag representing the attribute code from the import profile.
<xsl:value-of select="sku_data"/> – a structure for retrieving the value from the import file, where sku_data is the tag containing the attribute value in the import file.
Check the sample XSL template with the attribute values defined below:
- <xsl:stylesheet xmlns:xsl="http://www.w3.org/1999/XSL/Transform" version="1.0">
- <xsl:output method="xml" version="1.0" encoding="UTF-8" indent="yes"/>
- <xsl:template match="products">
- <xsl:element name="items">
- <xsl:for-each select="product">
- <xsl:element name="item">
- <sku>
- <xsl:value-of select="symbol"/>
- </sku>
- <xsl:element name="catalog_product_attribute">
- <xsl:element name="item">
- <name><xsl:value-of select="name"/></name>
- <price><xsl:value-of select="price"/></price>
- <image><xsl:value-of select="gallery/image"/></image>
- <small_image><xsl:value-of select="gallery/image"/></small_image>
- <thumbnail><xsl:value-of select="gallery/image"/></thumbnail>
- <description><xsl:value-of select="description"/></description>
- <short_description><xsl:value-of select="short_description"/></short_description>
- </xsl:element>
- </xsl:element>
- </xsl:element>
- </xsl:for-each>
- </xsl:element>
- </xsl:template>
- </xsl:stylesheet>
Import File Examples and Profile Configuration
Import Products
How to Import a New Product
To import a new product, some specific fields from the root entity are always required. Without them, the product will be imported, but its page will not open because the essential information will be missing from Magento tables. These required fields include attribute_set_id, type_id, has_options, and required_options.
In the import file, you can use SKU or Entity ID (internal product ID in the database) as the first column that will define the product itsed. Depending on that, corresponding option should be selected in the Product Identifier setting.
If we import only the essential fields mentioned above, a product record will be created and opened in the admin area without errors indeed, but the product will not be visible on the frontend. It will lack a name, price, quantity, and website association, making it functionally useless. Therefore, to import a fully functional product, additional fields are required. These fields won't be mandatory, and they can be adjusted based on the requirements to the product after import.
Here are the additional fields you may use for import of a new product:
Import Products module expects attribute's values (IDs that can be found in the database), unless the 'Option Label to Option Value' modifier is enabled. This modifier allows defining attribute option's label (text name) in the import file. If value ID's need to be clarified, navigate to the Stores > Attributes > Product > attribute's page, click with the right button on the needed option and click 'inspect', you will be able to see the value of this option in the browser's console.
The same processing logic goes for the website and stock values:
1) Import Proucts module expects website ID by default. It can be located in Stores > All Stores > website's page URL. Alternatively, please, enable the 'Website Code to Website Id' modifier to be able to define websites by their codes.
2) The extension requires stock ID unless the modifier 'Stock Name to Stock ID' is enabled for the field in the Import Profile. Stock ID or name can be checked at Stores > Inventory > Stocks.
You may refer to the Sample CSV Import File and this video to check how the functionality works:
Need expert guidance? With our Amasty One support subscription plan, you can schedule a live call with our specialists to get all your questions answered. We’ll help you configure the module step by step to perfectly suit your needs. Simplify your workflow and let us support your success!
How to Import Product Information Per Store View
In the example above for importing products, the store_id value isn't specified. As a result, such product data will be imported at the All Store Views level. Or, if store_id is added to import profile, you may set its value to "0", which corresponds to the All Store Views scope.
Let's consider another case where a website has multiple store views in different languages and we need to adapt product name, description, and other attributes for each store view. To do this, we need to check the store view IDs by navigating to Stores > All Stores and verifying the ID in the URL of the store view page. Then, we can include these store view IDs in the import file along with the corresponding attribute values.
Values for store_id can only be imported for attributes with the store view scope. Otherwise, the import will be finished without errors, but the value will be saved as the default scope one. Most commonly, attributes with the store_view scope include name, description, and short description of the product.The SKU scope cannot be changed, but for some product attributes, especially custom ones, it can be modified at Stores > Attributes > Product, on the attribute page.
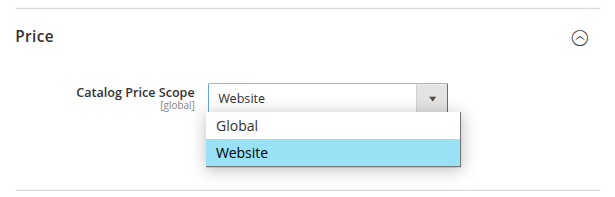
As for the price attribute, it can have either a global or website scope. This can be configured at Stores > Configuration > Catalog > Catalog > Price > Catalog Price Scope.
If the price scope is set to website, and we have three websites, each with its own store and store view, the data will be imported successfully, as shown in the example below.
If the price scope is set to website, and we have three websites, each with its own store and store view, the data will be imported successfully, as shown in the example below.
The following example demonstrates the fields needed for importing product data per storeview:
Here are some tips on how to check the ID values for the import file:
1) ID of the store view (store_id) сan be found in Stores > All Stores > store view's page URL..
2) As for the website_id, the module expects website ID by default. It can be located at Stores > All Stores > website's page URL. Alternatively, please, enable the 'Website Code to Website Id' modifier to be able to define websites by their codes as it is made in this example.
2) As for the website_id, the module expects website ID by default. It can be located at Stores > All Stores > website's page URL. Alternatively, please, enable the 'Website Code to Website Id' modifier to be able to define websites by their codes as it is made in this example.
You may refer to the Sample CSV Import File and this video to check how the functionality works:
How to Import Tier Prices
In order to import tier prices (also sometimes referred to as customer group prices), the following fields are needed:
Here are some tips on the values in the import file:
1) The all_groups field is responsible for the All Groups value. If it is 1, then, the tier price is valid for all customer groups. Otherwise, the value for the all_groups field will be '0'.
In a case the all_groups value is '1', the value for the the 'catalog_product_tier_price.customer_group_id' column can be any of the existing groups. If the field is empty, it has the default value as NOT LOGGED IN.
2) The group_id field stands for the customer group ID, which can be located at the Customers > Customer Groups grid in the 'ID' column. Alternatively, it is possible to enable the Convert group_code to group_id modifier, and import the code values from the file as in this example. The module will transform them to IDs automatically.
3) The module expects website's ID by default. It can be located at Stores > All Stores > website's page URL. Alternatively, please, enable the modifier to be able to define websites by their codes.
How to Assign Categories to Products
 Previously assigned categories can be removed from the product with the help of the Remove Product Categories setting in the General tab of the import profile. If it is enabled, first the products listed in the import file will have their category associations removed (i.e., the "Categories" field will be emptied). Then, if some categories are specified in the import file, they will be assigned to the product; if not, the product will have no assigned categories.
 Below are the fields needed for the import:
Since v. 2.1.0 Import Products module is also able to assign categories to the product using ‘category_id’ field (internal ID of a category which can be checked in page URL at Catalog > Categories > select category) instead of 'categories'. If categories field is used, the full category path must be specified, for example: Default Category/Gear/Bags.
Need expert guidance? With our Amasty One support subscription plan, you can schedule a live call with our specialists to get all your questions answered. We’ll help you configure the module step by step to perfectly suit your needs. Simplify your workflow and let us support your success!How to Import Categories
It is important to distinguish new category import from assigning existing categories to the products:New category import is done via System > Amasty Import > Import > Product > Product Category.
Here are the fields that are needed for import:
Here are some tips on how to manage the values in the import file:
1. entity_id is the ID of the category that will be imported. It should be unique for the new category. Categories' IDs can be checked at Catalog > Categories.
It is not necessary to select this field when importing a new category, as it will be auto-incremented during the import process.
2. attribute_set_id will always be 3.
2. attribute_set_id will always be 3.
3. parent_id is the ID of the parent category (higher level category that will include the imported one). Categories' IDs can be checked at Catalog > Categories.
4. is_active/is_anchor/include_in_menu: the module expects '1' for 'Yes' and '0' for 'No' by default. Alternatively, you may enable the 'Option Label to Option Value' modifier to be able to define 'Yes'/'No' in the import file.
How to Import Categories' Information per Store Views
After importing categories, it is sometimes necessary to import translations of their names for store views. This is also done through a one-time import in System > Amasty Import > Import > Product Category Attribute entity.
Here are the fields that are needed for import:
How to Import Inventory
The fields required for importing product quantity and stock status depend on the number of stocks and sources created on the instance. You can check their number at Stores > Inventory > Sources/Stocks.
These are the fields that are needed to update quantity and status on the instance with one stock and one source:
Here are some tips on how to handle the import values:
1. stock_id: the extension requires indicating internal stock ID in this field, unless the modifier 'Stock Name to Stock ID' is enabled for the field in the Import Profile. Stock ID or name can be checked in Stores > Inventory > Stocks.
2. is_in_stock: basic database values for this field are 1 for in stock and 0 for out of stock items. For more convenience, it is possible to add the 'Replace' modifier in order to replace text from the import file to the values stored in database. For instance, 'In Stock' > '1'
And here are the fields that are needed to update quantity and status on the instance with multiple sources:
1. source_code can be checked at Stores > Inventory > Sources.
2. For status field, basic database values for this field are 1 for in stock and 0 for out of stock items. For more convenience, it is possible to add the 'Replace' modifier in order to replace text from the import file to the values stored in database. For instance, 'In Stock' > '1'.
How to Assign Cross-sells, Up-sells, Related Products
In order to assign cross-sell, up-sell and related products, enable these fields. Select the subentity that that is required specifically for your case:
Keep in mind the difference between sku fields in Product (root entity) tab and the rest of subentities (Cross-sells Product Link, Related Product Link, Up-Sells Product Link). The former stands for the main product the data will be linked to, while the latter stand for the product(s) that will be linked.
How to Import Bundle Products
In order to create a link between a bundle product and its child products, the products themselves should be imported into Magento first.
To link simple products to a bundle one, please, enable these fields in the import profile:
Not all fields are mandatory for import (e.g., position), but it is recommended to include all fields to fully import the information. The essential fields are option, value, product, and parent_product_id.
Here are some tips on how to locate the values for some of the fields in the import file:
1) catalog_product_bundle_option.option_id
This value van be located in the DB table 'catalog_product_bundle_option'. Find the last value and increase it by 1 to insert in the import file.
2) catalog_product_bundle_option.parent_id
ID of the bundle product, which can be located at Catalog > Products grid.
3) catalog_product_bundle_option_value.value_id
This value should be checked in the 'catalog_product_bundle_option_value' DB table.
4) catalog_product_bundle_option_value.option_id
The same id as in the 'catalog_product_bundle_option_value' field.
5) catalog_product_bundle_option_value.store_id
"0" for All Storeviews. IDs of the separate storeviews can be located at Stores > All Stores > needed store view's URL.
6) catalog_product_bundle_option_value.parent_product_id
ID of the bundle product, can be located at Catalog > Products grid.
7) catalog_product_bundle_selection.selection_id
This value can be checked in the 'catalog_product_bundle_selection' DB table. Find the last existing value and increase it by 1 to insert in the import file.
8) catalog_product_bundle_selection.option_id
The same id as in the 'catalog_product_bundle_option_value' field.
9) catalog_product_bundle_selection.parent_product_id
ID of the bundle product, which can be located at Catalog > Products grid.
10) catalog_product_bundle_selection.product_id
ID of the simple child product, can be located at Catalog > Products grid. If the 'SKU to Product ID' modifier is enabled for this field, you may use the product's SKU in the import file.
Need expert guidance? With our Amasty One support subscription plan, you can schedule a live call with our specialists to get all your questions answered. We’ll help you configure the module step by step to perfectly suit your needs. Simplify your workflow and let us support your success!How to Import Configurable Products
In order to link a configurable product with its child products, the products themselves should be imported into Magento first.
These are the fields that are needed to link simple products to the configurable one:
Here are some tips on how to find the values for the import file:
1) catalog_product_super_attribute.product_id
The ID of the configurable product. It can be located at Catalog > Products grid.
2) catalog_product_super_attribute_link.parent_id
The ID of the configurable product. Can be located at Catalog > Products grid. By default, the module expects the ID of the configurable product in the field, but it is also possible to use product SKU in the import file instead. To do so, enable the Product SKU to Product ID modifier.
3) catalog_product_super_attribute.attribute_id
The ID of the attribute that will link the configurable product with simple options. For example, color, size. By default, the module expects the ID of the attribute, but it is also possible to use the attribute code in the import file. To do so, enable the Eav Attribute Code to Id modifier.
How to Import Grouped Products
In order to create a link between a grouped product with its child options, the products themselves should be imported into Magento first.
These are the fields that are needed to link simple products to the grouped one:
link_type_id is always '3' for grouped products.How to Import Base, Thumbnail, Small Images
If images are imported, it is important to define the Images File Directory path where these images are stored. If images are uploaded by URL, there is no need to add them to the directory, but it should still be mentioned in the import profile, so that the extension has an indication of where to download the images for temporary storage before adding them to products. Otherwise, it is necessary to add images to the Magento directory on the server manually. For instance, you can upload images to 'var/import' and define this path at Import Source > Images File Directory.
If the Images File Directory setting is empty, root Magento directory will be used.

Below are shown the fields that are needed to import images with roles:
How to Import Gallery Images
If you need to import only one gallery image, this can be done using the catalog_product_attribute.media_gallery field (Product Attribute entity in the import profile).
However, if multiple images need to be imported for a single product, the Product Media Gallery fields must be used.
It is necessary to add images to the Magento directory on the server, for instance 'var/import', and define the path to it in the Import Source > Images File Directory setting. If images are uploaded by URL, there is no need to add them to the directory, but directory path should be still mentioned in the import profile, so that the extension has indication on where to download the images before adding them to products.Below are shown the fields that are needed to import gallery images:
Here are some tips on how to work with the import file's values:
1) catalog_product_entity_media_gallery.attribute_id
Stands for the ID of the 'media_gallery' attribute. In order to use the label instead of the ID, add the modifier 'EAV Attribute Code to ID'.
2) catalog_product_entity_media_gallery.value
Stands for the image name, or URL.
3) catalog_product_entity_media_gallery.media_type
Will always be 'image'. So far, only images are supported by the Import Products module.
4) catalog_product_entity_media_gallery_value.entity_id
Stands for the product ID that is available on the grid at Catalog > Products. Enable the 'Product SKU to Product ID' modifier to use product SKU instead of the product ID.
You may refer to the Sample CSV Import File and this video to check how the functionality works:
How to Update SKU
Updating product SKU is not possible if it is set as the product identifier in the profile. Thus for such updates product ID should be used as the identifier, and both fields should be included in the import profile.
Please find the required fields below:
How to Import Product Custom Option
In order to import custom options, it is mandatory to specify option_id, product_id, and option_item_id.
Below you may check the fields needed for successful import:
Here are some tips on how to manage the values in import file:
1) catalog_product_custom_option.option_id
This value can be checked in the 'catalog_product_custom_option' DB table. The value greater than the latest one should be added to the file.
2) catalog_product_custom_option.product_id
The ID of the product, can be located on the Catalog > Products grid. Enable the Product SKU to Product ID modifier to use product SKU instead of product ID.
3) catalog_product_custom_option.type can contain the following values:
- drop_down
- field
- area
- file
- radio
- checkbox
- multiple
- date
- date_time
- time
4) catalog_product_custom_option.is_require
Defines whether the option is required. '1' stands for 'Yes', '0' stands for 'No'.
5) catalog_product_custom_option_value.option_type_id
5) catalog_product_custom_option_value.option_type_id
Can be checked in the 'catalog_product_option_type_value' table. Locate the last number and increase it by 1 to insert into the import file.
6) catalog_product_custom_option_value.option_id
The same value as in 'catalog_product_custom_option.option_id'.
7) catalog_product_custom_option_value.price_type:
Can be either 'fixed' or 'percent'.
Import Orders
How to Import New Orders
The Import Orders module has a useful setting called "Enable Autofill for Typical Use Cases", which, when set to "Only Add" behavior, will automatically add the necessary fields to the profile.
In the latest module version the number of required fields for import was significantly reduced. Current minimum required fields are as follows:
increment_id stands for the order number that can be found on the 'Orders' grid in the 'ID' column.
sales_order_item.order_id stands for the internal ID that can be checked in the URL of the order. It is sufficient to locate the latest ID of the order and insert a greater value in the import file.
When importing a new order, you can skip the order_id and parent_id fields, as their values will be automatically generated during the import.
How to Import Shipments
If you're importing orders themselves as well, the easiest way to create shipments for them is to enable the “Ship Order After Importing” setting in General Configuration > Actions with Orders After Importing tab.
When a shipment is generated automatically, it will apply to the entire order. Having enabled this action, avoid selecting any fields in the Shipment entity at Fields Configuration tab, otherwise the data will be duplicated.
However, in case you need to import a shipment with a particular number, or create a shipment for only one of the order’s products instead of all of them, you can use the following fields (these are the minimum required fields, and you can add additional info like customer details or tracking information if needed):
How to Import Invoices
Like with shipments, the easiest way to create invoices if you're also importing the orders themselves is to enable the “Invoice Order After Importing” setting in the General Configuration > Actions with Orders After Importing tab.
When the invoice is generated automatically, it will apply to the entire order. After enabling such action, avoid selecting any fields in the Invoice entity at Fields Configuration tab to prevent duplicates.
If this option doesn't suit you, or if you need to import an invoice with a specific number or create separate invoices for different products, you should use the following fields (these are the minimum required fields; you can also add the invoice status and customer information if needed):
How to Import Tracking Information
Use the following fields for import:
sales_shipment.entity_id is a mandatory field and stands for the shipment ID available in the URL of the shipment.
Import Customers
How to Import a New Customer
The essential fields required to import a record so that it opens from the customers grid without errors are shown in the screenshot below:
These fields can be added automatically when creating an import profile: navigate to Import Settings tab, choose the Customer Identifier field, select the desired Import Behavior, and enable the “Enable Autofill for Typical Use Cases” setting:
Here are some tips on how to locate certain ID values:
1) website_id:
Import Customers module expects website ID by default. It can be located at Stores > All Stores > website's page URL. Alternatively, enable the Website Code to Website Id modifier to be able to define websites by their codes.
2) group_id
This value can be checked in the Customers > Customer Groups grid in the 'ID' column.
3) store_id:
ID's of store views can be located at Stores > All Stores > needed store view's URL.
How to Import/Update Customer Addresses
To import customer addresses, the following fields are needed:
entity_id and customer_address_entity.parent_id stand for customer ID's that can be found at the Customers > All Customers grid.
customer_address_entity.entity_id is the entity ID of the address itself. The value can be viewed in the database, in the customer_address_entity table.
Need expert guidance? With our Amasty One support subscription plan, you can schedule a live call with our specialists to get all your questions answered. We’ll help you configure the module step by step to perfectly suit your needs. Simplify your workflow and let us support your success!
Related Articles
How to Import and Export Locations?
Starting from version 3.1.0, the functionality for importing and exporting locations has been changed. The previous method, which used the default Magento functionality (in System > Import), is now considered deprecated. Instead, our team has ...Can I import and export attachments?
Since v.3.5.0 Product Attachments extension adds compatibility with Amasty Import and Export module, enabling import and export functionality to the Pro version of the module. You can find the 'amasty/module-product-attachment-export-entity' and ...Which modules is the Import Export module compatible with?
A wide range of Amasty extensions come equipped with import and export core functionality. By purchasing them, you can migrate even more types of store data and thus achieve specific business goals faster. The following list of extensions comes ...Import and Export API
We have created a public API collection for Import-Export Core module with all available queries and sample data that you can both test via our demo endpoints and copy to run local tests in your Magento environment. More details about using public ...Is it possible to import data to Magento with a custom file?
It is possible to use a custom import file, but there are a few peculiarities that must be taken into account. Import modules provide features for flexible configuration of the import file like setting custom entity and field names or applying ...
Announcements
⚡ Have you enlarged the functionality of the Amasty extension with your own code? Share your improvements with us!
At Amasty, we understand that some of our clients require customized features to perfectly align the extension with their business needs. If you have developed new functionality within an Amasty module and would like to share it, please submit a ticket